
In sixth grade, I was required to take band class, where I could choose one of six wind instruments. A wind instrument is an instrument that you blow into to create music. I had heard good things from my associates about the clarinet, so I decided to give it a try. I learned the basics and played songs like Pirate’s Cave, This Old Man, and Olé. I ended up loving the item and I am here to share my experience with you! This guide will help you learn how to take care of a clarinet, how to make sounds on it, and even basic notes.
Like the image above, the clarinet is a wind instrument with a long body with holes evenly spaced throughout its length. By covering these holes, you can make sounds on the instrument. In a standard clarinet case, you will have a mouthpiece, barrel, and a small wooden stick. This stick is called a reed, and is integral to the construction of the clarinet.

A reed (like the picture above) is a small wooden stick, thicker on one end than the other. This part fits adjacent to the mouthpiece, and it comes with a metal ring to hold it in place. Make sure the skinnier end is what you will be blowing into. To make a sound, start by covering your bottom teeth with your bottom lip. Then put the mouthpiece in your mouth, while being careful that it does not protrude too far in, for it will make a squeaking noise as a result. Blow hard but steady into the mouthpiece without covering any holes, while stretching your jaw muscles. The result should be a high sound, which is actually the note G. Make sure to replace your reeds every couple of weeks, because they will break and impede your progress with the instrument.

The next thing to learn on the clarinet is finger placement, by following the photo above. Place your left thumb on the hole on the bottom of the instrument. Obviously, this is the only hole on that side of the clarinet, so this step is fairly easy. Then place your pointer, middle, and ring fingers on the three holes on the top. Your left pinky will not be pressing any holes for now. The right thumb will go on the bottom, on the finger rest. This rest shall stick out from the main instrument and provide a socket to hold your thumb, which will provide purchase and stability to hold the clarinet. Finally, place your final four fingers exactly like the left hand, but on the three other holes. You will want to keep your fingers close to the holes but not covering them, unless you are using them to play a note.
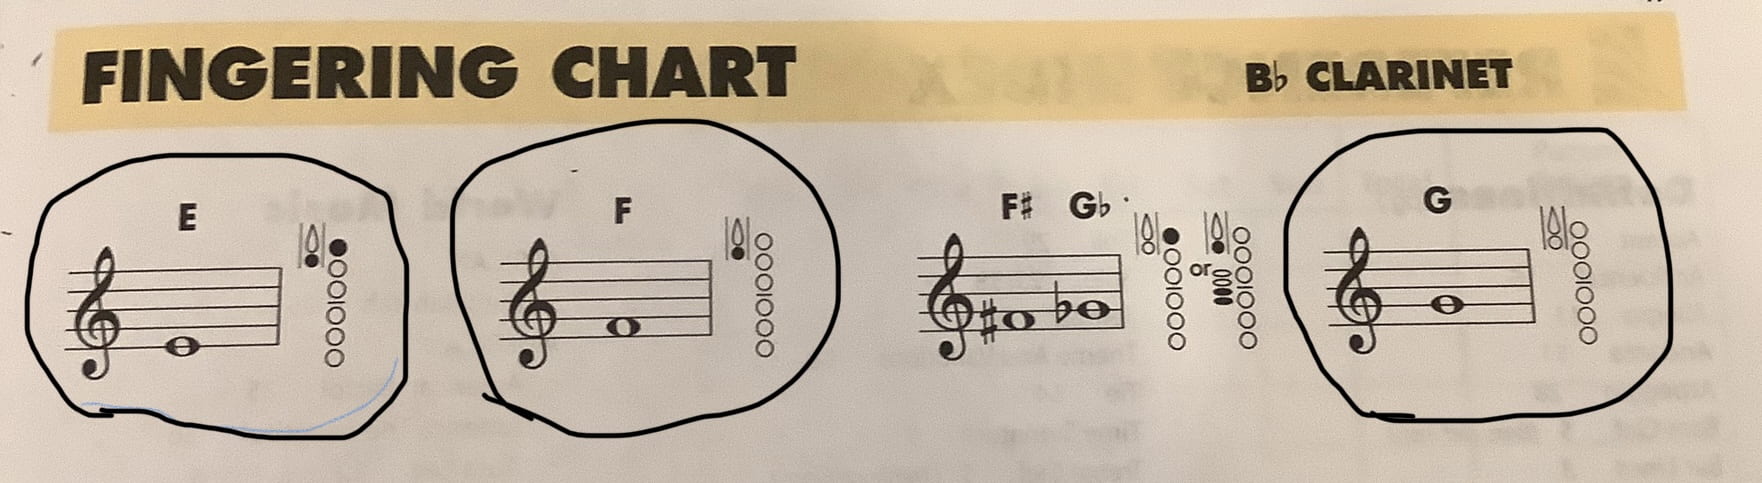
Now that fingering and the reed have been covered, the only thing left to teach is a few basic notes. The chart below details the placement of a couple of notes. G is simple- no fingers on the holes. F is a little harder, with your left thumb covering the hole on the bottom. Make sure to put the meaty parts of your fingers over the holes, to prevent squeaking while playing. The final note in this post is E, which is your left thumb and pointer covering holes.
I have loved getting to partake in a band class and learn an instrument. Hopefully this post has inspired you to look into the art of music
I like how much effort you put into writing this
I loved reading this Nolan! I am so glad you enjoyed your band experience because I thought you were an excellent student. I was so impressed at how you would learn different songs, outside of class, by yourself! I hope to have you in my class again someday 😁
Nice job!